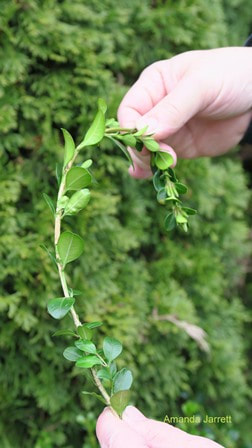
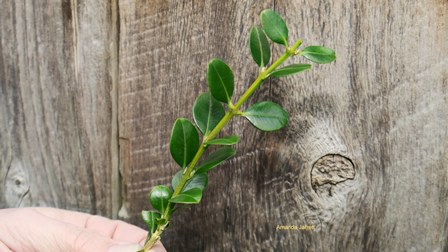
A semi-hardwood cutting of a boxwood. Photo Amanda Jarrett
The Basics - Types of Cuttings - Herbaceous Cuttings - Softwood Cuttings - Semi-hardwood Cuttings -
Hardwood Cuttings - Heel Cuttings - Basal Cuttings - Layering
Hardwood Cuttings - Heel Cuttings - Basal Cuttings - Layering
Cuttings are the best way to clone your favorite tree or shrub as seeds don’t always grow up to resemble the parent plant. It's also faster. Severing plant parts and inserting them into soil is a strange way of making new plants, but oddly enough it works. The key is knowing what time of year to do it and which part of the stem to remove. The main types of cuttings are: herbaceous, softwood, semi-hardwood, hardwood, heel and basal. I have also included basal divisions and layering.
Taking Cuttings - The Basics
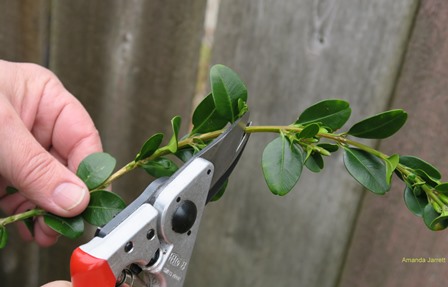
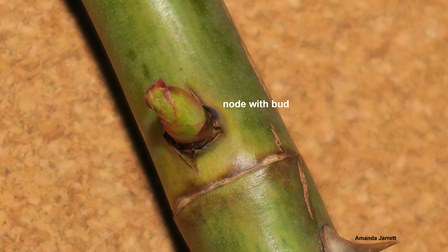
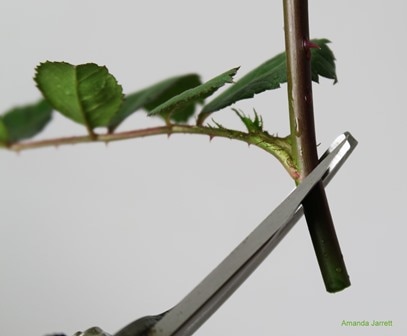
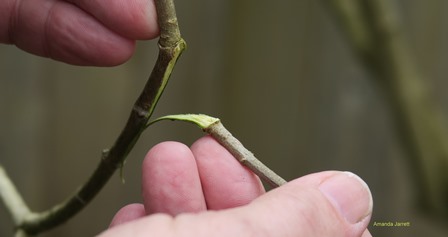
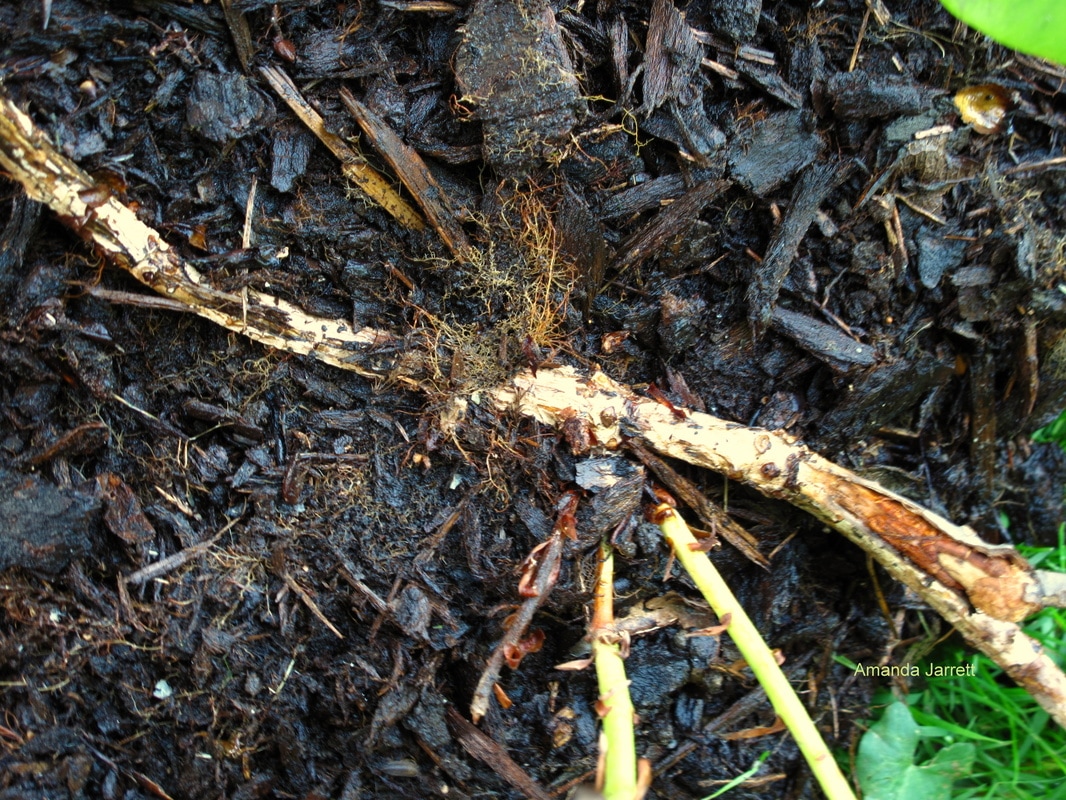
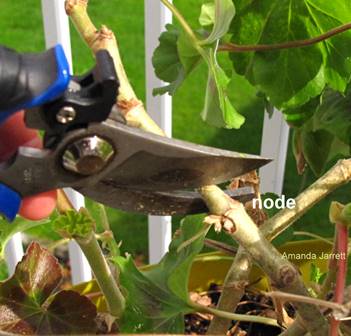 Cut just above a node to take a cutting.
Use sharp, clean hand pruners, clean pots and sterile potting soil. Take cuttings in the morning and place them in a plastic bag so they don’t dry out. Keep them cool, out of full sun and pot them up asap.
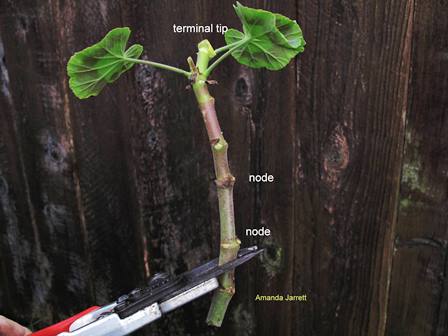
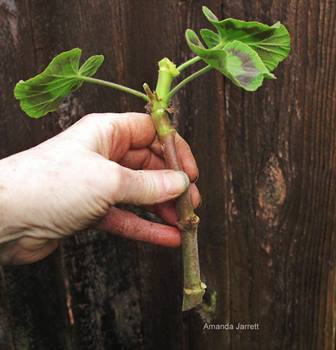
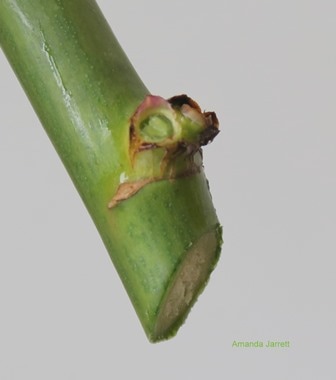
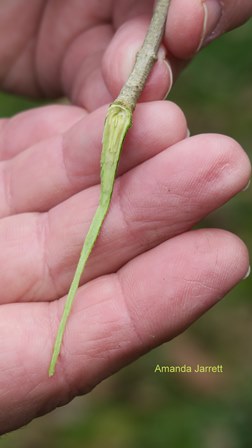
When taking cuttings, select healthy stems from the parent plant. Sever the stem just above a leaf, bud (node). A node is the lump (a bud) on a stem. The cutting should be long enough to include 3 to 6 nodes. Remove all side stems, flowers, fruits and seeds. Pinch off all buds and sprouts in leaf axils (where stems join) and snip off the terminal bud. Strip off all the lower leaves from 1/3rd to ½ of the cutting. For large leaved plants, cut remaining leaves in half to reduce transpiration.
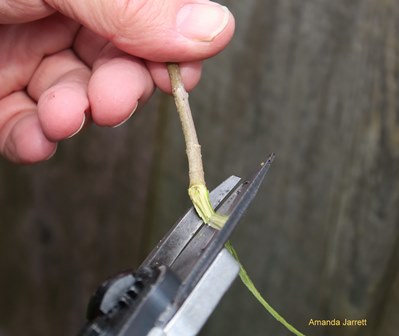
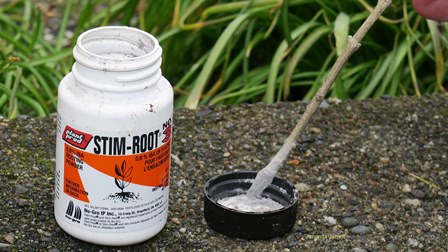
Before placing the cutting in soil and/or rooting hormone, the stem needs to be recut, just under a node. This node is where roots will form. It is not necessary to use rooting hormone especially for herbaceous cuttings, but it does speed up the process for semi-hardwood and hardwood types. If using rooting hormones, dip the cut end into the powder or gel and shake off any excess. Select the correct type and strength of rooting hormone depending on the type of cutting you want to propagate: herbaceous, softwood, semi-hardwood and hardwood.
Insert numerous cuttings into a pot with drainage holes filled with moist, free draining, sterile soil without overcrowding them. A good mix is 1 part coarse sand, 1 part peat & 1 part vermiculite. Avoid peat and peat pellets as they hold too much water, which causes rotting. Insert the cuttings right side up deep enough so at least two nodes (buds without leaves attached) are buried into the growing medium (soil) and firm the mix around them. Those buried nodes are where roots will form. Water gently with warm water. Mist a couple of times a day or cover with clear plastic bag by blowing air into the bag and seal with a twist tie. Place in indirect light out of direct sun, but not darkness.
When new foliage starts to sprout, it means roots have started to form. Wait until they get a few sets of leaves and roots emerge from the pot's drainage holes, then repot them into individual 2 to 4 inch containers. If you are growing them inside, don't forget to harden them off first before planting them outside. Have fun and good luck!
When taking cuttings, select healthy stems from the parent plant. Sever the stem just above a leaf, bud (node). A node is the lump (a bud) on a stem. The cutting should be long enough to include 3 to 6 nodes. Remove all side stems, flowers, fruits and seeds. Pinch off all buds and sprouts in leaf axils (where stems join) and snip off the terminal bud. Strip off all the lower leaves from 1/3rd to ½ of the cutting. For large leaved plants, cut remaining leaves in half to reduce transpiration.
Before placing the cutting in soil and/or rooting hormone, the stem needs to be recut, just under a node. This node is where roots will form. It is not necessary to use rooting hormone especially for herbaceous cuttings, but it does speed up the process for semi-hardwood and hardwood types. If using rooting hormones, dip the cut end into the powder or gel and shake off any excess. Select the correct type and strength of rooting hormone depending on the type of cutting you want to propagate: herbaceous, softwood, semi-hardwood and hardwood.
Insert numerous cuttings into a pot with drainage holes filled with moist, free draining, sterile soil without overcrowding them. A good mix is 1 part coarse sand, 1 part peat & 1 part vermiculite. Avoid peat and peat pellets as they hold too much water, which causes rotting. Insert the cuttings right side up deep enough so at least two nodes (buds without leaves attached) are buried into the growing medium (soil) and firm the mix around them. Those buried nodes are where roots will form. Water gently with warm water. Mist a couple of times a day or cover with clear plastic bag by blowing air into the bag and seal with a twist tie. Place in indirect light out of direct sun, but not darkness.
When new foliage starts to sprout, it means roots have started to form. Wait until they get a few sets of leaves and roots emerge from the pot's drainage holes, then repot them into individual 2 to 4 inch containers. If you are growing them inside, don't forget to harden them off first before planting them outside. Have fun and good luck!
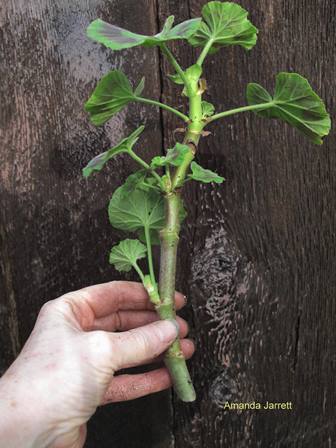
Herbaceous cuttings of Geranium, Pelargonium 'Red Orbit'

types of cuttings
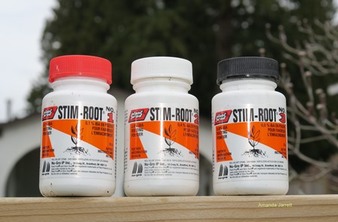 There are 3 strengths of rooting hormone depending on the type of cutting.
Herbaceous: Easy to root, take this type of cutting any time of year. Made from non-woody (herbaceous) growth on annuals and perennials. Select healthy, strong stems 3 to 5 inches long with 3 to 6 buds (nodes). Ex: petunias, impatiens, geraniums (Pelargonium), coleus
Softwood: This type root quickly, but not as easy as herbaceous cuttings. In May, June and July, remove the soft, succulent, new growth of woody plants as they begin to mature. The stems should easily snap when bent with mature older leaves and small newer leaves. Take cuttings in the morning when they are full of moisture. Suitable for deciduous shrubs and trees, perennials, climbers, woody herbs. Ex: hydrangea, buddleia, deciduous magnolias, fuchsia, hydrangea
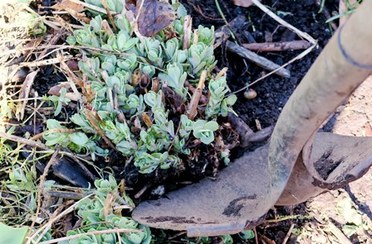
Semi-hardwood: Use partially mature wood of the current season’s growth just after a flush of growth, usually mid-July to October. The base of the stem should be firm and stiff but the end should be soft, but with mature leaves. Suitable for broadleaf evergreens, some conifers, woody herbs, ex: boxwood, camellia, choisya, California lilac, hebe, holly, juniper, lavender, potentilla, thyme
Hardwood: Make clones from your favourite trees, shrubs and woody vines with hardwood cuttings. Do this when plants are dormant during late fall through winter, and before spring growth begins. Select healthy vigorous stems that are a little rigid, that don’t bend easily. Use sharp clean pruners to cut stems 6 to 8 inch long. Sever each cutting from the stem just above a leaf. Re-cut the end of the cutting, directly beneath a leaf or node (bud).
On evergreens, including conifers, remove the lower leaves from two-thirds of the stem. Pinch or cut off the growing bud at the end of the end of each stem.
Place the cuttings in pots filled with potting soil or insert them into a prepared garden bed. Poke each cutting deeply into the soil so only one third is visible above the soil surface. Firm the soil around each cutting so they stand upright. Moisten the soil gently. Cover the soil with fallen leaves or straw to offer protection from the elements. The soil should be free of debris, weeds and drain easily. Suitable for deciduous shrubs and evergreens ex: dogwood, forsythia, honeysuckle, jasmine, apple, pears and other soft fruits, roses, mock orange, yew.
Softwood: This type root quickly, but not as easy as herbaceous cuttings. In May, June and July, remove the soft, succulent, new growth of woody plants as they begin to mature. The stems should easily snap when bent with mature older leaves and small newer leaves. Take cuttings in the morning when they are full of moisture. Suitable for deciduous shrubs and trees, perennials, climbers, woody herbs. Ex: hydrangea, buddleia, deciduous magnolias, fuchsia, hydrangea
Semi-hardwood: Use partially mature wood of the current season’s growth just after a flush of growth, usually mid-July to October. The base of the stem should be firm and stiff but the end should be soft, but with mature leaves. Suitable for broadleaf evergreens, some conifers, woody herbs, ex: boxwood, camellia, choisya, California lilac, hebe, holly, juniper, lavender, potentilla, thyme
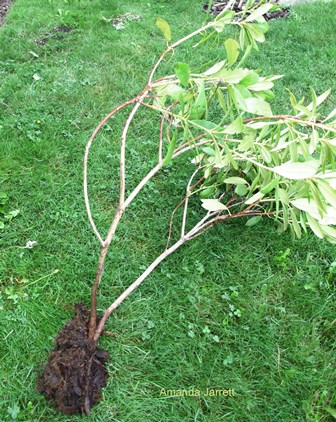
Hardwood: Make clones from your favourite trees, shrubs and woody vines with hardwood cuttings. Do this when plants are dormant during late fall through winter, and before spring growth begins. Select healthy vigorous stems that are a little rigid, that don’t bend easily. Use sharp clean pruners to cut stems 6 to 8 inch long. Sever each cutting from the stem just above a leaf. Re-cut the end of the cutting, directly beneath a leaf or node (bud).
On evergreens, including conifers, remove the lower leaves from two-thirds of the stem. Pinch or cut off the growing bud at the end of the end of each stem.
Place the cuttings in pots filled with potting soil or insert them into a prepared garden bed. Poke each cutting deeply into the soil so only one third is visible above the soil surface. Firm the soil around each cutting so they stand upright. Moisten the soil gently. Cover the soil with fallen leaves or straw to offer protection from the elements. The soil should be free of debris, weeds and drain easily. Suitable for deciduous shrubs and evergreens ex: dogwood, forsythia, honeysuckle, jasmine, apple, pears and other soft fruits, roses, mock orange, yew.
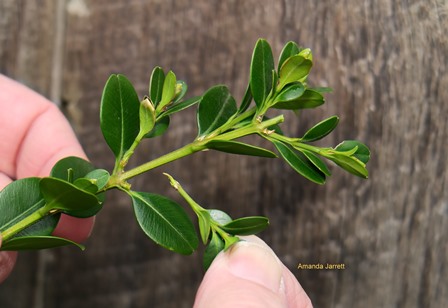
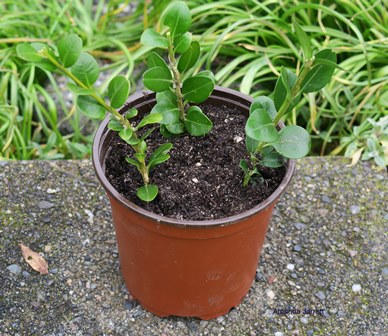
Semi-Hardwood cuttings of Boxwood


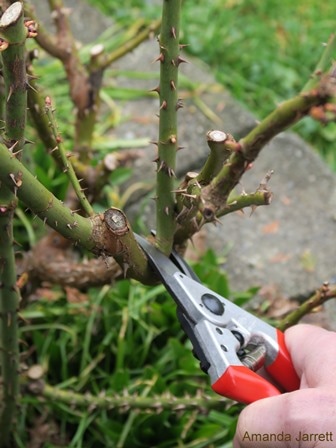
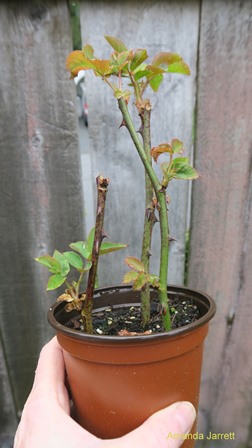
Hardwood cuttings of a rose

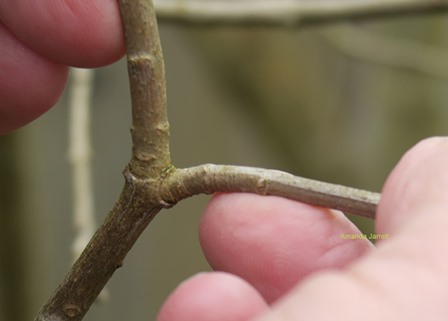
heel cuttings
Heel cuttings are made where a stem is pulled off with a piece of the stem attached. Select a side-shoot and pull down gently so a tail of the bark of the main stems comes with it. Trim the tail end of the heel with a knife or pruners. Remove the bottom leaves from the bottom third and the terminal tip of the cutting. Dip the heel into rooting hormone, shake off the excess and place in a pot with sterile potting mix. This method is suitable for all types of cuttings.
Hardwood heel cuttings of a lilac
basal cuttings & Divisions
 An easy way to multiply perennials is to sever parts of the base in early spring.
Basal cuttings are easy to make and generally successful. This method is suitable for perennials that have numerous stems growing from their crown (where stems join the roots) ex: delphinium, lupin, aster, phlox, penstemon. Basal cuttings are best done in spring when stems are 10 cm (4 inches) long. Remove the soil to uncover the crown and with a sharp knife, sever the stems. Try to include where the stem and crown join. Remove the lower leaves so they don’t rot when buried. Pinch off the growing (terminal) tip of the cutting.
Plant up to 5 cuttings around the edge of a terracotta pot filled with well-drained sterile potting soil. Cover the surface of the soil with ¼ inch of sand. Keep outside in a protected spot away from full sun but not in deep shade. One the roots appear from the pot’s drainage holes, which should take a couple of weeks, place each cutting into individual pots.
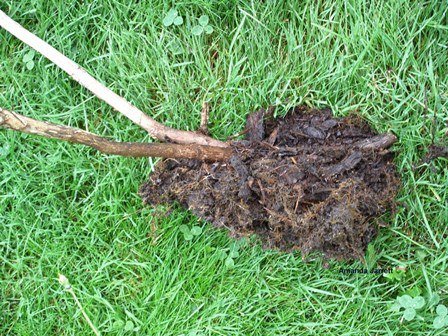
Basal divisions are even easier than basal cuttings. Instead of removing pieces of stem, use a shovel to cut off parts of crown. Split the crown in two or just sever pieces off, then replant them into the garden or into pots.
Plant up to 5 cuttings around the edge of a terracotta pot filled with well-drained sterile potting soil. Cover the surface of the soil with ¼ inch of sand. Keep outside in a protected spot away from full sun but not in deep shade. One the roots appear from the pot’s drainage holes, which should take a couple of weeks, place each cutting into individual pots.
Basal divisions are even easier than basal cuttings. Instead of removing pieces of stem, use a shovel to cut off parts of crown. Split the crown in two or just sever pieces off, then replant them into the garden or into pots.
Layering is another form of propagation that often happens naturally. You might have already discovered buried branches that have rooted. Rhododendrons and many other shrubs and most vines will root readily when a branch is accidentally buried. Select a low branch that easily touches the ground. Make a shallow hole for the branch to rest in making sure that 8 to 12 inches of the branch tip is out of the soil. Remove all the foliage from the stem that will end up being buried. Lay the stem in the hole and cover it with 6 to 8 inches of soil. If it wants to spring up, make some U pins cut from a wire hanger. Stake the remaining portion upright so it will grow straight. Keep it moist and in about 6 months roots should have formed on the buried portion. It has rooted when it offers resistance when tugged and new leaves emerge.
Layering Propagation
Check out:
|
|
Love plants, love to garden.. and making free plants from old ones.
Amanda's Garden Consulting Company The Garden Website |
Copyright 2017 The Garden Website.com, Amanda's Garden Consulting Company - All Rights Reserved