Potatoes, Earth's Treasure
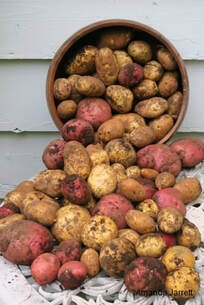
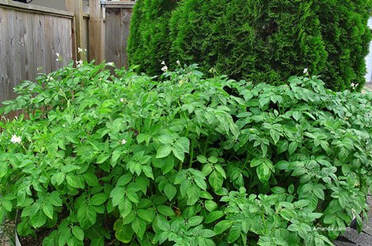
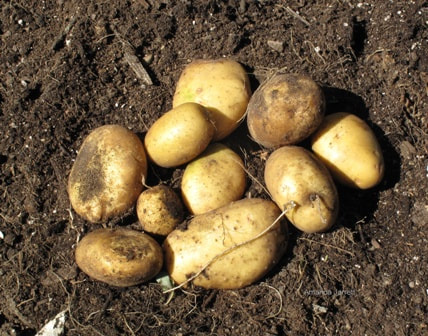
A bountiful and delicious potato harvest.
|
It’s so satisfying to plant only one potato and receive a bountiful harvest. This ancient vegetable has been a staple in many kitchens since the Incas grew them as early as 3,000 BC and rightly so. They are a major source of carbohydrates and vitamins: C, B6, potassium, thiamin, niacin, fiber, iron, and they even contain protein. The humble potato is such an essential source of food throughout history, it is featured in the documentary ‘Botany of Desire’. To check out the video click here.
|
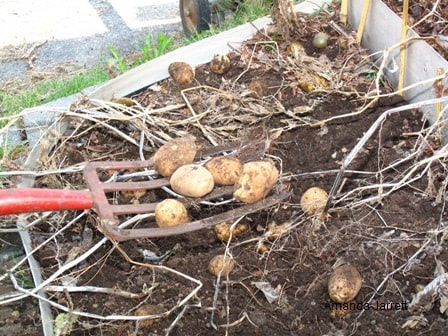
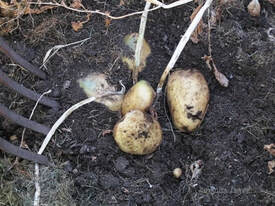
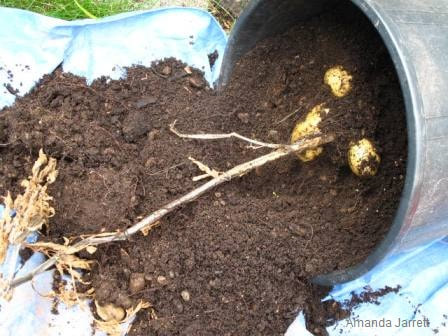
A garden fork is a useful tool to harvest your loot. Wait for the stems to die back first.
|
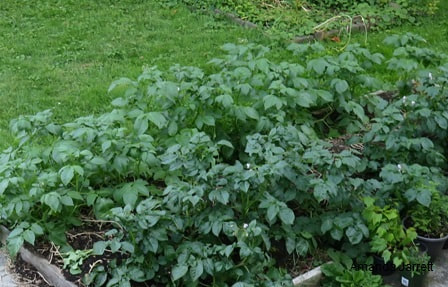
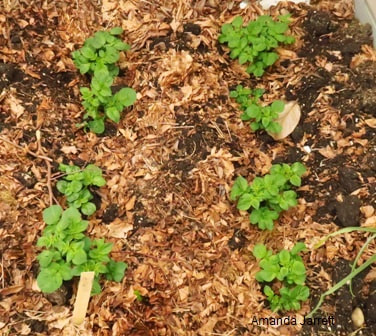
Just a few plants produces high yields.
|
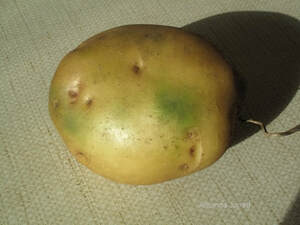
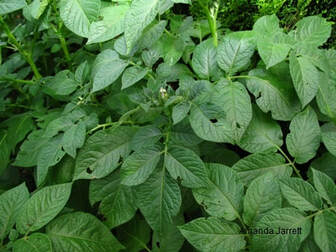
Potatoes are members of a large family, which includes peppers, eggplants (aubergines) and tomatoes. They all belong to the Nightshade family so care must be taken not to eat any of the green parts including the green skin that often develops when they are exposed to light.
Potatoes are actually underground stems and because they are stems, they contain chlorophyll, that’s why spuds turn green when subjected to light. The potatoes are fine to eat, just peel the green skin off. Also remove any sprouts or ‘eyes’. To prevent spuds from turning green and from sprouting store in a cool and dark location or in paper sacks.
Potatoes are actually underground stems and because they are stems, they contain chlorophyll, that’s why spuds turn green when subjected to light. The potatoes are fine to eat, just peel the green skin off. Also remove any sprouts or ‘eyes’. To prevent spuds from turning green and from sprouting store in a cool and dark location or in paper sacks.
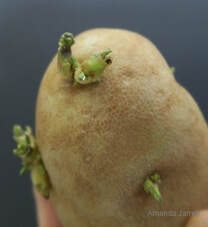
Potato 'eyes' are actually stems that are ready to grow.
|
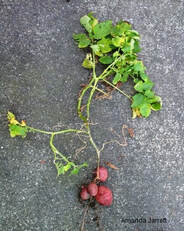
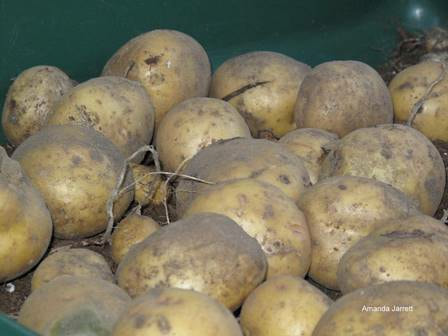
A potato plant grown from one seed potato.
|
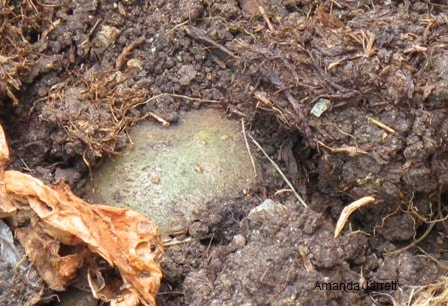
Potatoes are actually underground stems, that's why they turn green when exposed to sunlight.
|
When to PlantAs soon as the ground isn’t too cold and wet, plant potatoes. Weeds should be starting to grow and a handful of soil shouldn’t drip when squeezed. That’s usually anytime from March to the end of May.
Soil temperature should be at least 7.2°C (45°F). The warmer the soil the faster they will grow. Purchase seed potatoes as soon as they appear in the store. These tiny potatoes sprout quickly and are certified disease free. |

Purchase seed potatoes as they are certified disease free and sprout readily.
|
Preparing the Soil
Spuds must have an acidic soil that drains well. Mix in compost, but don't add lime.
|
Grow potatoes where beans, peas and other legumes where previously planted.
|
Plant in full sun, no less than 6 hours of direct sun a day. Potatoes must have good drainage as soggy soil promotes rotting. Enrich the soil by mixing in an inch or two of compost, SeaSoil, triple mix and/or composted manure. Potatoes need an acid soil with a pH from 4.5 to 5.5. Do not lime the soil as it promotes potato scab.
It’s a good idea to plant spuds where beans, peas or other legumes were grown in the previous year, or right after an early crop of peas have been harvested earlier in the spring. Legumes fix nitrogen in their roots, which is beneficial to potatoes. Just cut the tops off the beans or peas before planting the potatoes because it’s the roots of the legumes that contain the nitrogen.
It’s a good idea to plant spuds where beans, peas or other legumes were grown in the previous year, or right after an early crop of peas have been harvested earlier in the spring. Legumes fix nitrogen in their roots, which is beneficial to potatoes. Just cut the tops off the beans or peas before planting the potatoes because it’s the roots of the legumes that contain the nitrogen.
Preparing Potatoes to Plant: Chitting Potatoes
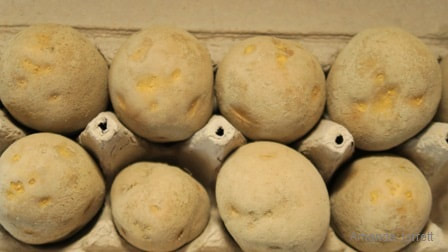
To 'chit' taters encourages earlier harvests and higher yields. Just place seed potatoes upright in a egg carton.
Seed potatoes can be planted without any preparation, however, they grow faster and yields are higher, if they get a chance to grow sprouts from their dormant eyes. This process is called ‘chitting’ and it’s usually done indoors.
Place each seed potatoes upright in an egg carton or muffin tin with the end with most of the eyes facing up. If you have many seed potatoes, place them upright in crates with slatted bottoms. Place them in front of a sunny window. Once shoots from the eyes are about ¾"-1" long, they are ready to plant. For fewer but larger potatoes, keep only 3 or 4 of the shoots and rub off the rest.
Place each seed potatoes upright in an egg carton or muffin tin with the end with most of the eyes facing up. If you have many seed potatoes, place them upright in crates with slatted bottoms. Place them in front of a sunny window. Once shoots from the eyes are about ¾"-1" long, they are ready to plant. For fewer but larger potatoes, keep only 3 or 4 of the shoots and rub off the rest.
Planting Spuds
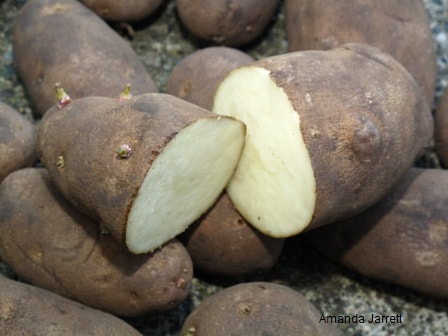
Either plant whole potatoes or slice them in half. Make sure each half has a few eyes.
|
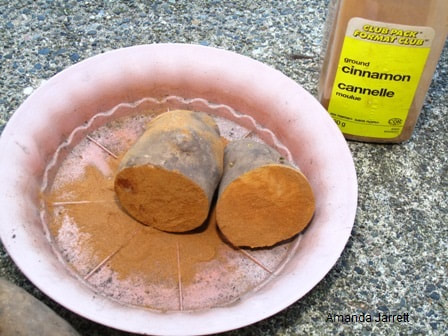
Allow cut potatoes to dry for 2 to 3 days and dust the cut end with cinnamon before planting.
|
Plant whole potatoes or cut them in half, but each piece must have a few sprouts. Cut the potato 2 to 3 days before planting. If you wish, dip the cut end into some cinnamon as it’s a natural fungicide.
Dig a trench approximately 3 to 6 inches deep and plant each potato about a foot apart – sprout side up! Bury them with 3 to 4 inches of soil. Pile extra soil up along the trenches as you will need it to continue to bury the stems as they grow. Don’t water them until you see sprouts emerging from the soil then keep the soil evenly moist. Don’t allow the soil to dry out after they sprout as the plants will die back affecting the harvest quality and quantity.
Dig a trench approximately 3 to 6 inches deep and plant each potato about a foot apart – sprout side up! Bury them with 3 to 4 inches of soil. Pile extra soil up along the trenches as you will need it to continue to bury the stems as they grow. Don’t water them until you see sprouts emerging from the soil then keep the soil evenly moist. Don’t allow the soil to dry out after they sprout as the plants will die back affecting the harvest quality and quantity.
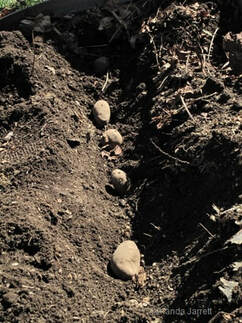
Place seed potatoes in a trench eyes side up.
|
Don't water until their leaves emerge.
|
The Importance of Hilling
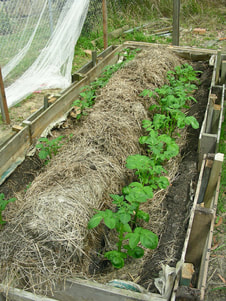
Hill spuds with soil or straw as they grow to encourage higher yields.
|
Potatoes grow along their stems and above ground exposing them to sunlight, which turns them green. Adding soil over top of the plants prevents this and makes more spuds.
|
If you wants lots of spuds, bury the stems as they grow. This is called ‘hilling’. As plants grow, add more soil around the base of each plant. Continue to partially bury the stems making sure no potatoes are exposed to the light as this will turn them green. Green potatoes contain a poisonous substance called solanine, which causes stomach ache. For those potatoes that do turn green, just remove the green skin as the rest of the potato is still good to eat.
Harvesting
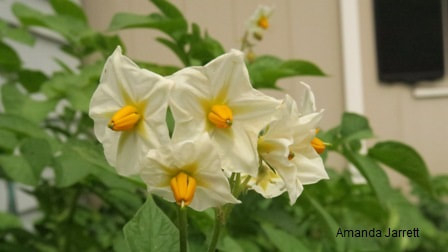
Potato flowers indicate that tender sweet new potatoes are ready to harvest.
|
Harvest new potatoes by reaching in a pulling out a few unless you want to harvest the entire crop.
|
New Potatoes: To harvest ‘new’ potatoes, those small sweet delicious gems, remove them from the plant when they are in flower or dig up the entire plant and harvest them all.
Main Crop Harvesting:
When the stems start to wither, cease watering. When all the stems have withered away, wait 3 weeks to harvest so their skins harden. This prepares them for curing and storing. Harvest the entire crop on a dry day, preferably when the soil is dry. Instead of using a shovel, use a garden fork as it’s easier to separate them from the soil. Once harvested, brush off the soil, don’t wash them as it promotes rotting. Cure them by placing them in a cold, dark, frost free place with good ventilation for a couple of weeks. This toughen up their skins so they will last longer in storage.
Place them in cardboard boxes or on shelves covered with newspaper in a cool, dark location. Make sure they don’t receive any light so they don’t turn green. Check on them regularly and remove any damaged or diseased spuds. Store them in a cool room, 2-4 C (35 to 40 F) such as an unheated basement or garage or fridge. Remember to keep them away from light and frost.
Pick a dry day to harvest potatoes.
|

Don't water plants after the stems wither. Wait three weeks then harvest. Place in a dry place.
|
Cure potatoes in a dry cool spot and cover to prevent the light from turning them green.
|
Growing Potatoes in Containers
I kept filling the laundry basket with soil as the potatoes grew up inside.
|
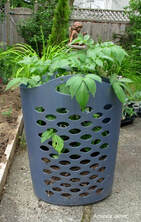
You don't need a garden to grow potatoes. This 5 gallon nursery pot was quite productive.
|
The container produced healthy numerous spuds.
|
If you don’t have room in your garden or have no garden you can still grow potatoes in containers. They do quite well as long as the container is large enough and has drainage. I have used big black 5 gallon nursery pots and as an experiment, a laundry basket – and both methods work well.
Select a pot with drainage holes and add about 4 inches of potting soil, not garden soil to the bottom of the container. Place your seed potatoes placed 4 inches apart and cover them with a couple of inches of potting soil. Treat them the same way as ones planted in the ground add more soil as they grow to cover the stems.
Select a pot with drainage holes and add about 4 inches of potting soil, not garden soil to the bottom of the container. Place your seed potatoes placed 4 inches apart and cover them with a couple of inches of potting soil. Treat them the same way as ones planted in the ground add more soil as they grow to cover the stems.
Potato Scab
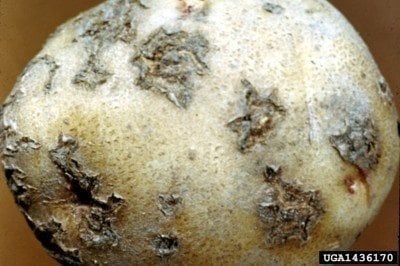
Potato scab doesn't affect the taste of the potato, just peal it off before cooking.
|
Potato scab is the most common of all potato ailments. It’s caused by soil that is just too sweet. Taters prefer acidic soils no higher than a pH higher of 5.2. Don’t add lime to the soil before or after planting as this increases pH. To lower pH, add sulfur or dust each seed potato before planting.
Symptoms appear on the potatoes only in the form a scab-like growth. Since this disease also overwinters in the soil it’s important to clear the garden bed from all potato foliage and parts after harvesting. Avoid planting potatoes from the grocery store’s produce section, only plant certified disease free seed potatoes. Russet potatoes have a better tolerance to scab. Scab does not impair the taste of a potato, but is does look unsightly, just cut off the scabs before cooking. |
Colorado Potato Beetle
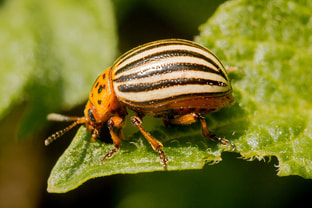
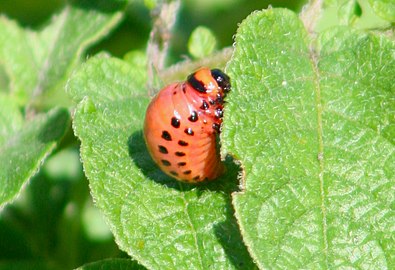
Colorado potato beetles are potatoes worst enemy.
|
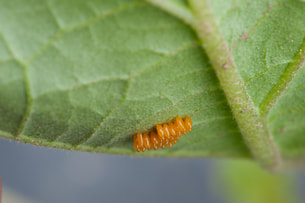
Look on the undersides of the potato foliage for their eggs and rub them off.
|
The infamous Colorado potato beetle start off by nibbling irregular holes at the edge (margins) of the foliage. Both larvae and adult beetles continue to devour the tissue between the veins so only the veins remain resulting in a skeletonized foliage. Potatoes are not the only victim of Colorado potato beetles as they feed on all members of the nightshade family: peppers, tomatoes and eggplants. Both the larvae and adult beetle
The adults are 1 cm long beetles with five brown stripes along their amber coloured backs. Their larvae has a dark red body with a black head. To reduce and prevent infestations, fall clean-up is important as the adults overwinter in the soil where the potatoes were harvested. The beetles emerge in spring to feed and lay hundreds of orange or yellow eggs. The eggs hatch in 4 to 15 days and become larvae. The larvae has two rows of dark brown spots along their backs. As they feed on the foliage, they go through 4 stages of growth. In their last phase of growth they drop and burrow into the ground and pupate. After 5 to 10 days, the adult emerges to feed and to mate. This whole process takes about 21 days.
The easiest way to control these beetles is to hand pick them off the plant and deposit them into a cup of salty water. To kill the larva use the bacterium Bacillus thuringiensis specifically for Colorado potato beetle larva. Products made from Neem oil will deter the insect from feeding. Try a tea made from tansy leaves and flowers and spray on the plant while the insects are present. And finally, mulch with straw as soon as the potato leaves emerge from the soil. The mulch hinders the beetles from finding the spuds and increases the beetle’s predators. And since these insects overwinter, do a thorough clean up in fall. Make sure all potato plant parts are removed and discarded, don’t put them in the compost.
The beginnings of beetle damage.
|
The larva and beetle feed on the foliage.
|
Rotate Your Crops!

Potatoes won't be planted again in this bed for a few years.
|
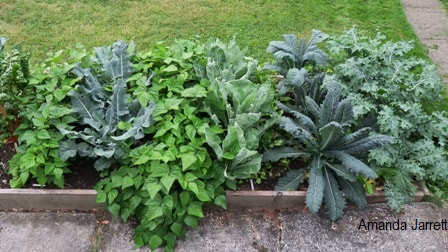
In the meantime, I will use the bed for companion planting.
|
Finally, don’t plant potatoes in the same spot as last year; rotate all your crops yearly. Note that all members of the nightshade family are prone to the same diseases and insects. They also use the similar nutrients within the soil, therefore don’t plant potatoes where tomatoes, peppers, eggplants and especially potatoes grew the year before or the year before that. It’s best to wait 4 years to plant in the same spot. Crop rotation is an important part to reduce disease, insects and increase soil fertility. For more on crop rotation click here.
But Wait...There's More...
For more information on growing vegetables click on the links below:
- Crop Rotation, Succession and Companion Planting.
- Taming Tomatoes
- Speeding Up Tomato Harvests
- Tomato Tips
- Tomato Troubles
- Tomatoes Seedlings to Plants
- Growing Potatoes
- Harvesting
- Winter Veggie Gardening
- Building a Potager (French Kitchen) Garden
- How to Build an Easy Veggie Garden Trellis
- Plant Pests Part 1
- Plant Pests Part 2: Controlling Insects
- Slugs & Snails
- Growing Seeds Indoors
- Growing Seeds Outdoors
- Soil Building
- Compost Tea
- Composting
- Fertilizing & Feeding Plants